“Lightroom Preset Collection for Portraits”
Today I’ll be reviewing a new product from Sleeklens.com, a collection of Lightroom development presets and brushes they are calling “Strike a Pose Workflow“. These tools are specific to editing and enhancing your portrait photography images. They help to expedite your workflow and provide better results for those who may not have professional level knowledge and editing skills with Lightroom. I’ve noticed an increase in the number of offerings on the web lately for this type of preset product, and for good reason. They truly can be a time saver. They also can be a very interesting way to improve your own skill set beyond the use of the presets themselves. We will talk more about that later in this review. So let’s get started and see how well Sleeklens has done.
What is a Lightroom preset?
If you are already familiar with how presets work and what they are used for, then just skip this section and move straight to the review below. If you are not quite sure what they are (and what they are not), then let me give a brief overview. Lightroom presets are nothing more than a combination of development tool settings which have been saved so that you can quickly return to that same effect later. Basically it’s no different than any preset you may use on any software (or other device). Think of it similarly to the preset on your car radio that allows you to jump to a specific position on the dial with a single button push, and so it is in Lightroom. With a single click of the mouse we can set one or more development settings within Lightroom to the positions saved within the preset. So how does this differ from just manually adjusting those tool parameters yourself? It does not. It’s just faster, that is all. Where you really start to save time is in not re-inventing the wheel as they say. I’m sure most of you have at some time developed a photograph that took you a long time to get just right. You experimented with tool after tool and setting after setting. Eventually after minutes (or even hours) of experimentation you nailed it! Then weeks later you encounter another image that would have benefited greatly from that same “look”, but now you must play the game all over again. It’s a new day, new state of mind, etc … you may find yourself unable to even replicate that look and even if you can it is still time consuming. Had you created a preset for that laborious look you created the first time, then you could simply click the mouse and your there. All those same settings from the first image have been applied to this new image. Wonderful, yes?
But every photo is not the same is it? If you truly wish to make the most of a given image, more so than slapping on a “one size fits all” preset, than you must modify your settings in the best manner possible for this specific image. The beauty of presets is that they are no more than saved settings of the Lightroom tools accessible to you in the development module. So now that you are 90% to perfect on this photo using the preset as your starting point, you can complete your piece by making finer adjustments, simply by changing the settings/sliders as you see fit.
I mentioned in the introduction that the Sleeklens workflow collection includes both development presets and brushes. The “brushes” are really a misnomer as there is no change to the brush itself in Lightroom (like we can do in Photoshop), but merely a change to the development settings applied to the brush (eg: contrast, exposure, sharpness, etc). All in all they are the same thing as the development presets only rather than applying globally to the entire image, they can be “brushed/masked” onto the image wherever you want the changes to occur.
Strike a Pose – Review
Development Presets:
Organization: Both the development presets and brushes are organized into “sections” for different needs (“all in one”, “base”, “exposure”, “color correct”, “tone/tint”, “polish” and “vignette”). Each section will focus setting changes to a particular development module (except the “all in one” labeled which affect all modules at once). The “sections” are differentiated by name using a “section number” – “section name” – preset name (which tends to help describe the outcome of the settings). The idea being you will start in section “0” and move down the list progressively. Not required, but often the best way to do it. I’ll discuss this more in the “stack-ability” portion below.
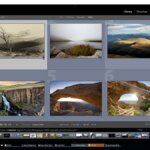
Sadly Lightroom does not provide for a way to break the presets within a folder into sub-folders or collapsible sections (can’t imagine why) so the rather lengthy (69) list of presets takes considerable scrolling to find what you want. This is not the fault of Sleeklens, they are just working with the limitations that Adobe has placed on them; however, you can easily break this list down into separate folders if you wish by creating new preset folders and moving the appropriate presets into the new folders. Note, that these new folders will still be “top level” folders, not child folders. Again Adobe, why you have to be like this? There are some advantages and disadvantages to breaking a collection into separate folders. For me, I just like organization and so I prefer more folders (and sub-folders), but for some it’s just an additional step they would prefer to avoid by having to open additional folders. Another con to breaking them into separate folders is that you cannot “scroll preview” the entire collection at once as you can when they are together. By this I am referring to the preview shown above “Presets” in the “Navigator” window. It displays a quick preview of the “look” you will achieve from a given preset when you roll over it. This can be quite handy and allows you to simply move your cursor over each name to view the result on your image. In any case reorganizing is really an individual choice.
Stacking Presets: A particularly nice feature of this collection, is the ability for these presets to become stack-able. And what does that mean? Let’s say you select a preset “x”, and then you click a new preset “y”. If any specific development tool is being used by both presets then “y” settings will overwrite “x” settings. The idea of stacking presets is the ability to select “x” and then “y” and the changes are additive. Sleeklens accomplishes this by making all the presets within a given section specific to a particular development module(s) that do not overlap the other sections (excepting “0 – all in one”). In this way I can make a change “x” and then add change “y” without those changes interfering with one another.
Note: I was able to find some presets from different sections that were failing at stack-ability and were in fact using overlapping settings, so unfortunately the system isn’t quit perfect, but for the most part it works as it should. The few exceptions I don’t feel will be of any great issue for most users.
Workflow: So in a nutshell here is the recommended way of using the product. Once you open up your preset collection you would want to start with one of the “all in one” options. By simply rolling the cursor over the names of each preset starting with “0” you can get an idea of the resulting image within the navigator module window (just above preset module). This is going to get you in the ball park of what you want. Note: you do not have to do this, but it really does speed things up. You then will move to section “1 – base”, then to section “2- exposure” and so on down the line. Now you have mixed-matched the presets creating a customized look for your specific image. Lastly you will enter directly into any of the development modules to tweak settings getting you that last 10% to perfection.
Brushes:
Organization: The brushes are set up identically to the development presets only with different “sections” (“Burn”, “Color”, “Dodge”, “Face”, “Haze”, “Light”, “Portrait”, “Skin”, “Sunshine Light” and “Vignette”). Unlike the development presets I am not aware of any way to reorganize the brushes into their own separate areas like folders and such. Again, don’t understand Adobe. Anyone using lots of brushes is forced to do a slow “arrow scroll” up and down the list. The “Strike a Pose” collection alone has 69 brushes. Start adding more brush collections and it gets to be a pain.
Note: Once you open your list of brushes you can use your keyboard to “jump” to a starting letter. One way you could ease this problem is by renaming each collection with a starting letter. Example: A – Strike a Pose….. B – Grey scale Essentials Brushes…. C- ….. you get the idea. It’s not a great solution, but for some with a large number of collections (possibly hundreds of brushes) it can at least get you to the right collection quickly.
Stacking Brushes: Stacking of brushes is possible just as with the development presets (see workflow below).
Workflow: Brush workflow is slightly different so as to allow for stacking. The key is one brush with one preset. Grab a brush and make some changes with “brush x” > select “new brush” > make additional changes with “brush y” > repeat. Because each brush is its own little world you do not have to worry about overlapping tool settings; however, to be clear if you try and change brush presets within the same brush you can again get overlap and unintended changes to your image. Beyond this the use of brushes is identical to the development presets. You can still modify each brush settings beyond their default to get things just right for your particular image. I won’t be going into how to use brushes in this review since it is not specific to Sleeklens or any collection of presets for that matter.
Pros & Cons:
- PROS
- Ease of Use: This collection seems well made with a great deal of thought put into organization, workflow and naming of presets. It’s very intuitive and most people will feel quite at home with it soon after installation.
- Training: Sleeklens has put together a number of videos to help introduce you to the product and how to use it. I watched them all and they do the job to get you started.
- There is room for improvement in the videos. I would simply like to see more of them demonstrating more ways to use the large selection of presets and brushes. I don’t think many customers will be fully aware of what can be done. Additionally I would like to see more detailed instruction on modifying the presets for that last 10%. I realize that is more of Lightroom training in general than directly related to the product, but I think it would help their sales and their customers.
- Price: As noted earlier in the article there are a lot of these preset bundles out there. Some are very expensive and some are free. I think Sleeklens.com has done a great job of balancing quality and price. These are definitely professional grade tools sold at an enthusiast’s price range.
- Bundles: This is just one of many Lightroom preset collections they offer which can be purchased as a bundle for additional savings.
- New Presets: While not specific to Sleeklens you can create your own presets built upon the ones you have purchased. Once you modify a preset or brush you can always “save as new preset”.
- CONS
- New LR Features: One thing missing from this collection of presets is integration of new LR features like color and luminescence range masks. These are very powerful new tools that would take their brushes to a whole new level. I did not see any evidence that these brushes make use of this tool. With that said you can of course still modify the color and luminescence range masks yourself. Hopefully Sleeklens will come out with an update soon using these powerful features with their brushes.
Unexpected Benefits of Presets:
For those on the fence about spending the money for a collection, I would offer this little incentive. Presets are a great way to expedite and refine your Lightroom skills. Each time you use a preset, scan the modules and take note of what tools were used, the settings that were used, etc. By comparing those settings with the resulting changes to your image, you can start to more quickly piece together new ideas and strategies for dealing with specific image problems. Soon you’ll be creating your own unique looks based on the knowledge gained by simply observing these professionally created looks. I actually learned a couple things myself today just while writing this review.
I hope this review of Sleeklens.com Strike a Pose Workflow package was of use to you. You may read more about this product from the vendor’s website at: SleekLens | Strike a Pose Lightroom Presets
Full Disclosure:
- I was contacted by Sleeklens and asked to write this review.
- They did not compensate me monetarily but did provide a free version of their product with which to evaluate.
- I was under no obligation to publish this article.
- The opinions given are mine alone and are in no way influenced by any 3rd party.
Tags:
- #sleeklens.com #strikeapose #lightroompresets #developmentpresets #lightroombrushes #brushpresets #lightroomworkflow #lightroomtraining #lightroom #adobelightroom #usingpresets