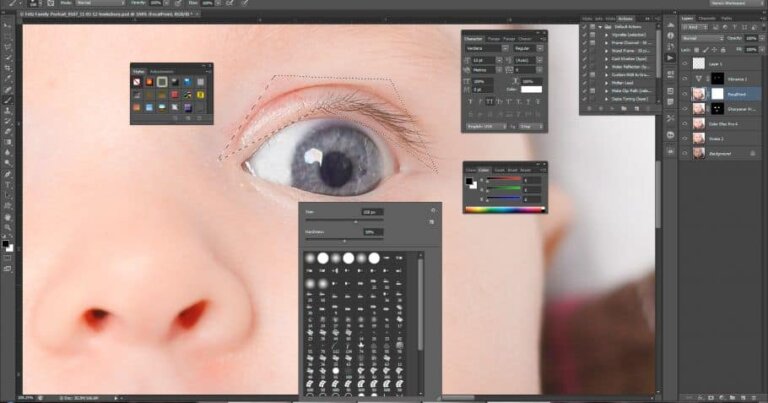
Photoshop of course is an amazing way to do touch up work on portrait photography. However, all too often the touch up artist takes things too far, either by choice or more often becuase they simply don’t know the techniques for doing natural touch up work in Photoshop. The following article gives you some basic touch up techniques for skin, eyes, lips and teeth that result in very realistic natural looking images. As with anything in Photoshop, there are a hundred variations on these techniques, but to get the basic concept down, just grab a portrait of yourself and follow along with the advice below.
Please note that these tutorial techniques shown below are far from a complete list of options for tackling these issues. Be sure to continue to research and develop an arsenal of techniques in your repertoire since different techniques work best in varying circumstance.
Note: the tips below assume a working knowledge of Photoshop on your part. If your not already familiar with the major tools you might get a bit lost. Don’t let that stop you however. I find that the best way to learn is dive in head first above your skill set. That’s how I learned everything I know.
Skin Touch Up Techniques
Blemish Removal
- Duplicate your layer.
- Use spot healing brush with “content aware” feature checked.
- For dark spots you can set mode to “lighten”, this help to save detail which surrounds the dark spot.
- For light blemished you would change your mode to “darken”
- Be sure to use soft edge brush.
Skin Smoothing
- Go into channels palette.
- Look for the channel with the best skin texture. (often red channel)
- Load that channel as active selection (cntrl click thumbnail)
- Now back in layers palette, create a blank layer mask using the selection from the channel.
- Make a sample color of the skin with the eyedropper. Then using pressure sensitive pen (if you have one) and very soft brush (make sure to set your brush options to “pen pressure”, paint away at the face in the new layer (paint on the layer not the layer mask).
- Be sure to keep re-sampling the color often as the color tone changes around the face.
- The layer (created by the channel selection) help us to keep the “true” texture of the face since we are only painting this color on the lighter parts of the skin.
Contouring
The object here is to modify structure and shape to a face.
- Pick a slightly darker shade than subject’s natural skin tone. Just sample subject’s face near the cheek and then move the color selection darker. You can also use the actual sampled color and then change the blend mode to “multiply”. This helps prevent accidentally using too dark a color.
- We use this color to contour (create shadows) the face to accent cheek bones.
- Create a blank layer. Using a soft edge brush paint in color under cheekbone along the jawline.
- Use low “flow” settings so that you gradually layer the color on. Just like real makeup.
Highlighting
- Once again sample subject’s face in the lighter area of the face.
- Again create another layer mask using channels just like you did in the skin smoothing.
- Set layer to “screen mode”
- Paint highlights with soft edge brush in a “triangle shaped motion” under the eyes.
- Paint again along the side of the nose to help narrow the nose.
- Paint just above lip and on chin (this strengthens chin).
- Again use a very low “flow”.
Add blush. You can sample a desired blush color from subject’s face (for a natural look) and paint the blush gently (low flow) on the tops of the cheeks. Remember you can use opacity to help make it look more realistic.
Eyes TouchUp Techniques
Eye Shadow
Outer Eye (for close set eyes)
- You can give the illusion of eyes being farther apart by using a slightly darker color and paint from the center of the eye, above the eye and painting outward. This “pulls” the eyes apart.
- Take the same color and from center / out you paint just under the eye along the lid. In the “lash line”.
- You can use the smudge tool (mid strength) too smear edges to blend the color and give softer lines.
Inner Eye Highlight
- Sample tear duct area, then paint (screen mode) along water line area to highlight this area.
Eyebrow Fixes Touch Up Techniques
Adjust the Curve
- To adjust the overall curve of an eyebrow you can use the “puppet warp” function.
- First you make a broad selection around the eyebrow. Be sure to leave plenty of skin around the eyebrow itself.
- Copy and past this selection onto a new layer.
- Use gaussian blur to blur the new layer. (amount will vary)
- Turn the new layer into a smart object so that you can come back and make changes again in the future.
- Using the puppet warp add anchor points to the areas of the brow that you do not want to move.
- Then place an anchor point at the end of the brow where you are tring to curve the brow.
- Grab the anchor point and pull down or up gently to curve the brow as needed.
- Finally you can go back with a light soft erasure and blend out any edges of the selection which don’t look quite right.
Add density to hair
- Use the pen tool to draw a loose shape of the eyebrow.
- Make the path an active selection on a new layer. (you can use a color stroke to better see where the selection is).
- Sample color which matches the brow
- go into brush options and chose a one pixel brush and use shape dynamics “checkboxed “ and “control”>”fade”. Basically you are creating a brush which mimics a single eyebrow hair,,, then you draw in the eyebrows within the masked area. This looks more natural than just cloning hair, because you can make each hair follow the appropriate direction of the brow and you get natural randomness.
- Then use a slightly darker hair in a layer underneath the first you get a natural effect where dark hairs are deeper than top hairs.
Fake Eyelashes
- You can use pre-made eyelash brushes to paint on fake eyelashes. (there are many to purchase on the web. I’ll try and provide you some free ones soon in a post update).
- Once you place the eyelash shape onto the eye, just use the warp tool to conform the fake lash to the shape of the eye.
- Use the smudge tool with a very small brush to smear the bottom of the lash along the actual lid to give more reality.
- You can change the color of the lashes to a more realistic color matching a very dark version of the natural hair.
- Fill in the eye’s waterline with the same color as the lash itself.
Lips Touch Up Techniques
Add a “cupid bow” (the dip in the lip under the nose)
- Make a large loose selection around the mouth (like we did with eyebrows)
- Use Gaussian blur on the new selection on it’s own layer
- Use “liquify” tool
- Using brush size approx the size of the dip you want push down the pixels to create the dip in the lip.
- Now using the layer mask on the new layer you can paint away the “streched skin” giving you a truly realistic look
Highlights on Lips
- Make a duplicate of lip’s bow layer you made (or if you did not create a cupid’s bow, then follow the same selection method and create a new layer)
- Paint away everything except the lips themselves (Including the teeth)
- Shift Cntrl U > brings up levels. You can then squeeze the contrast until you only see the specular highlights of the lips.
- You could also use “color range” to select the highlights. Make sure you have no actual lip background,, just the highlights.
- Drop the opacity down to something natural.
- If you want to add highlights to somewhere on the lips that does not exist, then you can duplicate that layer and resize and warp as needed.
Teeth Touch Up Techniques
Whitening
- You want to avoid whitening teeth to something fake.
- Duplicate layer and set blend mode to “screen”. Paint the teeth and it will gently whiten the teeth using the actual color of the natural teeth.
Fix Teeth
- If you have a bad tooth on one side but it’s good on the other.
- Select area of “good teeth” and copy to new layer. Select large and loose.
- Mirror the layer and move to the area on the other side of teeth which you are trying to fix.
- Paint away all the excess area you don’t need using a very soft brush.
- Use warp to distort the image so it’s not an obvious mirroring of the other side.

