Photography Equipment:
Landscape photography is not a highly “techie” / gear oriented area of photography. This makes it a very cost effective area of photography to enter.
- Camera Body: For the most part, with the exception of a few specialized techniques, modern DSLR camera body will work just fine. Nearly all modern bodies have enough megapixels to produce generous print sizes. Things like sensor noise at very high ISO, fast continuous shutter release, buffer sizes, etc. have less bearing on landscape photography so often the basic consumer grade cameras will produce images as well as the professional grade ones.
- Lenses: Lenses will make a difference. While it’s certainly not necessary to have pro quality lenses, unlike the camera body, the lens will make a more substantial difference in your final results.
Often good lenses are equated with “fast glass” (ie: wider aperture values). However, that is not really the case when discussing landscape photography. Since landscapes do not move and we often are using tripods, we have no real need for expensive “fast” lenses. Additionally we tend to shoot landscapes at higher f/stops anyway to increase our depth of field. So you would be unlikely to ever want to shoot at wide apertures provided by “fast” lenses.- With this in mind your main concern with a landscape lens is simply that it is sharp (most lenses have suitable sharpness for most consumers). So save your money and get a wider selection of lenses so you can increase your compositional options. What range of lenses you want is up to you (and your budget), but I would recommend:
- Wide Angle: 16-35mm – this is my main landscape lens (Nikon – but most brands have something similar). This one is my first choice.
- Medium Range: You generally are going to want some sort of “semi- telephoto” for some types of shots. So something like a 24-85mm would work well.
- Telephoto: 70-200 or similar: If you are very landscape-centric you probably do not need a telephoto, but I personally like picking out specific objects in a scene for a “closer look”.
- All Purpose: If your budget is more limited. I would recommend just going for a “super zoom”. This allows you to really cover all ranges easily in a single lens. Now super zooms usually don’t go super wide, so if that’s your style you may need two lenses still.
- APS-C sensor (crop frame) cameras: I recommend a 18-200 (or similar)
- Full Frame cameras: I recommend a 28-300 (or similar)
- Tripod: A good tripod will play a very large role in the quality of your landscape images. Without the tripod you cannot achieve the maximum sharpness that you probably want. It is also an absolute requirement for some types of specialized landscape imagery (hdr, compositing, long exposure, etc)
- Brand: what brand is not important as long as you get a reasonable quality.
- Head: For the most part you’ll want a ball head. Again make sure it’s of quality or it will “creep” and be of little use to you. Creep is when the head cannot lock the ball still due to the weight of the camera causing the camera to slowly creep down in its position.
- Weight: This is a troublesome area. The heavier your tripod is the better! More stable, Period! But who wants to hike mountains dragging all that weight around? So you must make a decision about weight versus stability. If you photograph in windy environments – go heavy. Some tripods have hooks that allow you to add additional weight by hanging a sand bag.
What do I use? I use a couple different Manfrotto Tripods and Heads because they are not so absurdly expensive as some other pods, yet they are reasonably high quality.
Keeping Things Sharp:
- Tripod: Already discussed above.
- Bean Bag – Don’t have a tripod? (or still too lazy to bring it), then buy a bean bag from a craft store. Even better just take an old sock and drop a 1 lb bag of dried split peas or beans into it. Makes an amazingly stable camera holder. That bag can then be placed on the ground, logs, tree branches, rocks, etc to position it where needed.
- Shutter Release – touching your camera’s shutter release will increase blur in your image.
- Release cables are cheap and connect directly to the camera allowing you to trigger the shutter without touching the camera.
- Remotes are generally infrared triggers that will fire the shutter from a distance without anything touching the camera.
- Self timer is a free easy option if you don’t have a trigger available. Just set your timer for 2 seconds (default is usually 10 and nobody needs to wait that long) and shoot using the camera’s release button. Note that this method is less desirable when there is a breeze, because you do not want a delay when that breeze stops for a second or two. You want to be able to shoot pronto.
- Lock Mirror – most DSLR cameras will have a “lock mirror” option. This lifts the mirror (which redirects lights from the lens into the eyepiece) and keeps it in the “up” position. Why? Because when you take a photograph, that mirror must move up and out of the way so that light can reach the sensor (rather than being redirected into your eyepiece). When the mirror flips up it causes vibrations in the camera. Does it really make a difference? That’s up for discussion. I have never seen any significant difference, but often I will use delayed exposure mode (below) if I am doing relatively slow shutter speeds (less than 20th of a second)
- Delayed Exposure – This setting allows you to still use your viewfinder until you press the shutter release. Once fired the mirror flips up as usual; however, there is a variable delay between the mirror flip and the actual shutter movement. This allows time for the vibration caused by the mirror to dissipate before exposure.
Camera Settings:
- Shooting Mode: For your average landscape you’ll shoot in either A (aperture priority) or M (manual). Your preference.
- What aperture to use? This is totally dependent on the situation and will vary from shot to shot. If you have foreground objects in the scene you’ll want to make sure they are sharp along with the distant objects, thus you’ll want a larger depth of field (ie: higher f/stop) – maybe f/11 or more depending on the proximity of the foreground objects. If there are no foreground objects, then f/8 is probably satisfactory and generally produces the best sharpness for many lenses.
- Why not just always use a high f/stop to cover your bases? The higher you push your f/stop generally the more light refraction you encounter and thus loss of image quality.
- To learn more about depth of field read this tutorials
” Depth of Field – What you need to know “
- Where to Focus? Again this depends on the scene. There is something called “hyper focal distance” which will give you the maximum depth of field possible for a given f/stop; however, that is beyond this basic tutorial since it requires math and calculations and additional knowledge about your specific equipment (there are apps to do the math for you). See rules of thumb below:
- No foreground: focus about 1/3 of the distance through the scene visible within the frame.
- Foreground: focus on your foreground object. (making sure to be using a much higher f/stop).
- Image Format:
- RAW vs JPG: There is no discussion here for the most part. RAW has far more information in the photograph (dynamic range, color space, sharpness) allowing you to produce much better imagery. I won’t go farther into this topic here since it can get very in depth, but suffice to say you want to shoot in RAW.
- ISO: For most purposes you’ll want to be at its lowest setting unless you require faster shutter speeds (example: moving objects in the scene) that cannot be obtained otherwise.
- Bracketing:
- If you are unsure of what exposure is going to work best you can use your camera’s bracketing feature which allows you to shoot multiple frames of each photograph, each at a different exposure. It automates this for you so you can quickly capture these varied exposure values. In one image the sky might be washed out but in the next it is more detailed.
- The other reason to bracket is for shooting in poor lighting situations where you have a large dynamic range (darkest to brightest points in the photo). By photographing the scene in multiple exposures you can use specialty programs (hdr) or compositing to take the best exposure for each part of a scene. For instance you may pull the sky/clouds from one photo and the mountains from another. Combine them together in a composite and now the photograph looks perfect.
- Filters: While there are any number of filters out there to improve your landscape images, for the beginner, you really only need one (or maybe two).
- Circular Polarized Filter: This filter reduces haze and improves colors. It is most often used to improve sky saturation and increase detail in clouds. It is also useful to reduce reflections off of water and wet rocks.
- Polarized filters have a spinning glass that allows you to control the intensity of the effect.
- The effect is most applicable when the sun is at a 90 degree angle to what you are shooting.
- This filter is your priority. If you have extra money to spend, then add the ND filter below.
- Buy glass, not plastic filters.
- Neutral Density Filter: This filter simply reduces the amount of light coming through your lens, just like sunglasses.
- The purpose of reducing light is to extend your shutter speed when the image would otherwise be over exposed with a slow shutter. If the lowest shutter speed you can achieve without over exposure is ½ second, using an ND filter can decrease that shutter speed to (1 second, 2 seconds, 4 seconds, 8 seconds, etc) depending on the strength of the filter you are using. (I recommend that if you are only going to own 1 ND filter, make it a 4 stop filter – also known as 1.2x ND filter).
- Why slow the shutter? When photographing scenes like a waterfall we can get more pleasing results when shooting at longer shutter speeds (think of that stretched out “cotton” look you have seen in many waterfall photographs).
- Buy glass, not plastic filters.
Composition:
Hands down the most important part of landscape photos, but since it is a whole topic of it’s own I will simply point you toward my composition tutorial rather than rewriting it all.
- Rules of Composition
- A couple landscape specific tips for composition.
- If they sky is interesting, then try and include lots of sky. If it is dull, plain, nothing in it, then include little sky.
- Adding foreground helps to make people feel like they actually “in” the photograph far more than if you do not include a foreground.
When to Shoot:
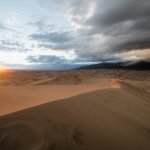
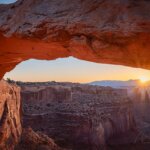
You have heard this a million times by now I’m sure. You want “soft” light that occurs during the dawn and sunset hours. Not only does it add wonderful colors to the landscapes, but it also adds direction to the light and soft shadows that provide depth to your images. Most importantly it reduces the intensity of the light so that you are not combating huge dynamic range issues.
- If you are not willing to get up in the dark to be on location at dawn (or go home in the dark to stay on location through sunset) you are drastically limiting your ability to get good landscapes.
- If you think you can just show up at a location one time and get a great shot you are kidding yourself. Yes, sometimes it will happen serendipitously but generally, no. You need to be willing to come back to a location over and over at different times, seasons, etc until you get blessed with that perfect photo.
Random Tips:
- Using a very high f/stop will produce a “flare” to the sun when included in the frame. It gives you that star burst look.
- Fall colors look really good just after a rain. An overcast moist day makes the tree colors really pop.
- Many people want to shoot landscapes during bright sunny days. Why? Because it looks pretty to the eyes. But to the camera it’s a nightmare. Cloudy overcast days are your friend, so use them.
- When shooting waterfalls with your neutral density filter you are going to be using a long exposure. How long? Well, that depends on many factors include distance from the camera, size, speed and flow of water…. So it’s generally an experiment. However, you can use the bracketing (we discussed before) in S (speed priority) mode and this will take multiple photographs with varying shutter speeds. Then you can pick the best options when you get home. I personally don’t do this, I just “chimp” until I get the look I want.
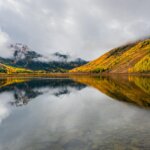
- If you want to get reflections out of water (lakes, ponds, etc) you’re best time of day is usually sunrise (before the winds start to move the water around). If you cannot get there in time for still water, then using a ND to extend your shutter speed can often help. By using a slow shutter speed (very slow) you can often average out the ripples in the water to the point where it begins to look glassy and smooth. For more information do a search on my blog for “long exposure photography”.
For more information on Black and White Landscape Photography, please check out this tutorial.
#landscape-photography #tutorials #training #photography